I've been a heavy user of Greenshot for many many years, but starting up this blog has caused me to think about the tools I use and wonder if there's anything better out there, anything that can help just that little bit more.
I take a LOT of screenshots in my job, and it may surprise you to know it's not for blackmail nor covering my arse when shit hits the fan... at least, not just that.
I get bombarded with the usual social media adverts for scribe and other documentation focussed solutions, but I wondered if there was something open-source, that could replace Greenshot but also make my screenshot look prettier and more consistent with minimal effort.
To my great surprise, this popped up in my search - ShareX - open source, multi-platform, very customisable!
There's two reasons why I decided to try it out, and they are Scrolling Capture and Image Effects. But I stayed because of the customisable hot key combos, and how each hotkey can override any of the settings meaning that you can have two different hotkeys for 'region capture', but each applying different image effects, or one going to clipboard, the other uploading straight to Imgur or etc. It also can...
Use it as a colour picker, Shorten URLs you have in clipboard using bit.ly and 5 other providers, and upload any text you have in your clipboard to Pastebin and 6 other providers, and then return the share URL into your clipboard for sending to others!
Scrolling Capture
This features grabbed my attention immediately so I had to check it out... it was exactly as I hoped. The ability to automate the screenshot of something longer than your screen. Like a vertical panorama. Important that you keep the mouse over the item you want to scroll, but then it's all automatic and hands off, just sit back and let it reach the bottom - if you want to stop then click or move your mouse outside the area.
Add Image Effects
There are a bunch of presets available directly from ShareX, as well as being able to make your own.

Those are great examples, but perhaps not what most people would want to use without tweaking further.
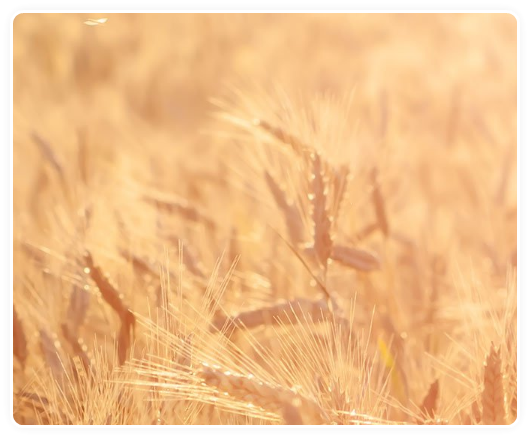
I wanted something much more subtle, so here's what I went with...
- "Auto Crop: 20" - this automatically removes any consistent colour - so I don't have to be too accurate capturing the region or cropping as a post-processing step. This effect can also optional adds back pixels to give it some consistent padding, I've gone with 20px.
- "Rounded corners: 10"- because sharp corners are dangerous - I picked 10px radius on the corners.
- "Canvas: 3" - this simply expands the image, you can pick a background colour or leave it transparent.
- "Background: 255, 255, 255" - this draws a new background colour, or gradient. I picked white here.
- "Rounded corners: 13" - now I'm adding the rounded corners to the newly expanded image with the white border/background.
- "Shadow: 10" - this adds a faint drop shadow around the lot.
Hot Keys
You can set a specific hotkey to perform any of the actions, along with associated tasks. This means you can capture a region of the screen as well as running as many 'After Capture Tasks' as you want, here I have chosen to run the image effect task and copy to clipboard all at the same time. You can see that there's lots of options if you want something nuanced or different.
So I use ctrl + print screen to
- Capture Screen Region
- Override 'After Capture Tasks'
- Set the Image Effects Task to use the 'Blog' Preset I made above
Customisable
Perhaps the only downside this app has is how flexible and customisable it is, it may look daunting at first, but it's worth the initial play to get it tweaked to help you properly, it's worth it.
I sincerely encourage you to try it out!
It's even got a QR Code Generator built in! The wonders never cease.